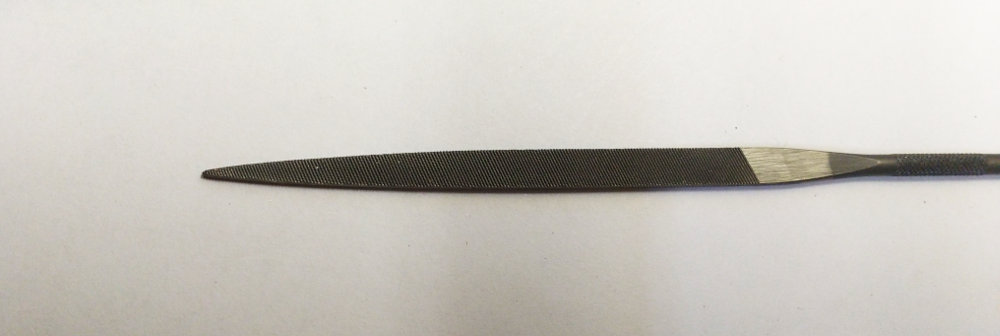
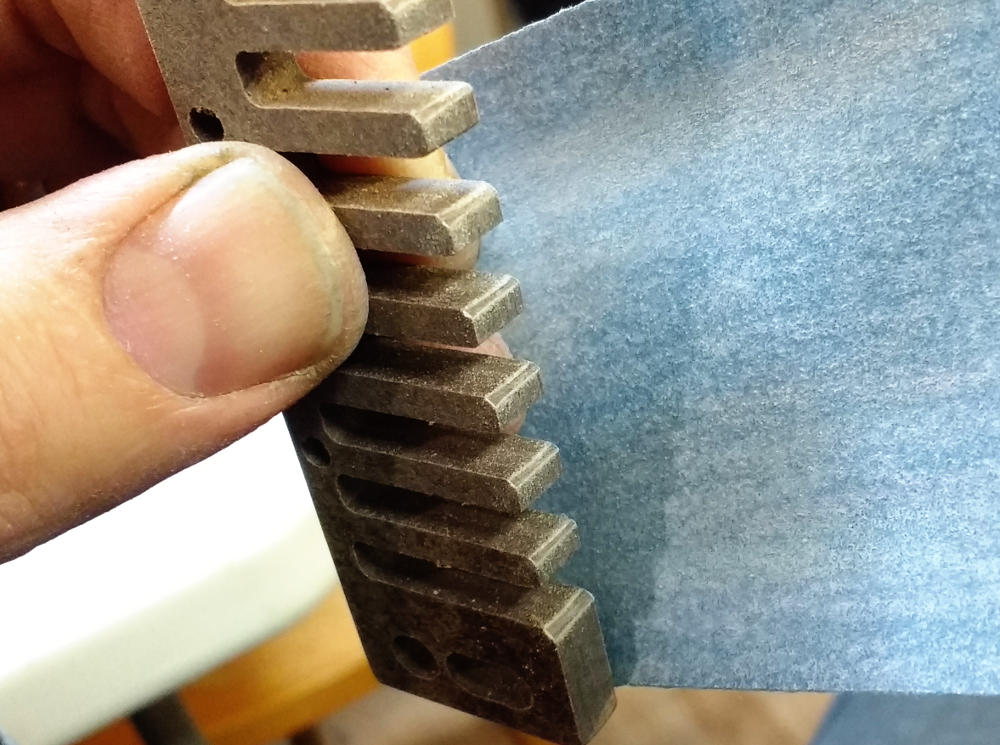
0-Cut is right on the margin between coarse and fine. It's perfect for removing brass with a light touch. It's coarse enough to have power but doesn't leave scratches and tracks on the reed.
Warding shape: Like a flat triangle with teeth on every side.
Raise or lower the pitch of a reed with the reed plate on or off the comb.
This file works on Brass, Stainless Steel and Phosphor Bronze reeds.
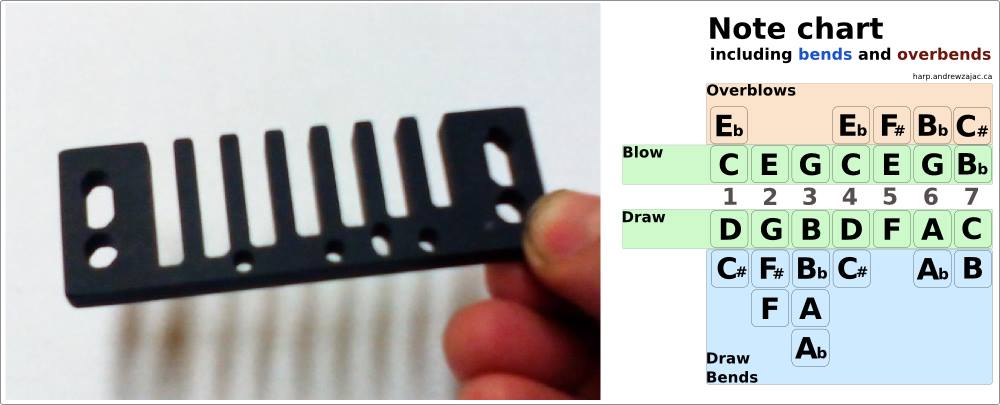
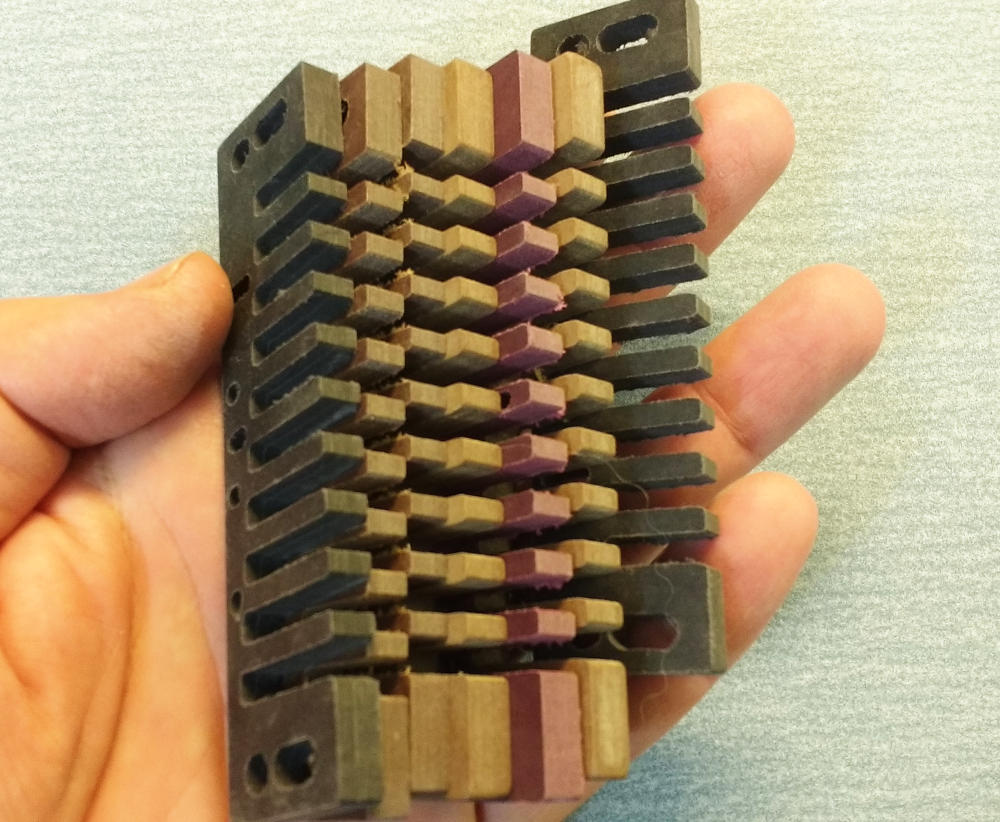
This is a custom comb I first made in February 2016
You can tune the 7 hole any way you like. Here, by lowering the 7 blow, we gain a draw bend. Add 7 blow into the top end blow chord and you get a minor seventh.
You can modify a standard cover plate to fit by trimming away the top end and doing a little folding and smoothing. Sorry, I don't have a photo of the finished product.
Barry bought my tool kit and overdid it on a reed. In this video I will show you the steps I take to correct this problem using pressure and counter pressure.
Would you like me to make a video about your "best" mistake? Contact me and let me know your ideas!
This is a one-time-offer. The price is for the lot (plus a few extra goodies).
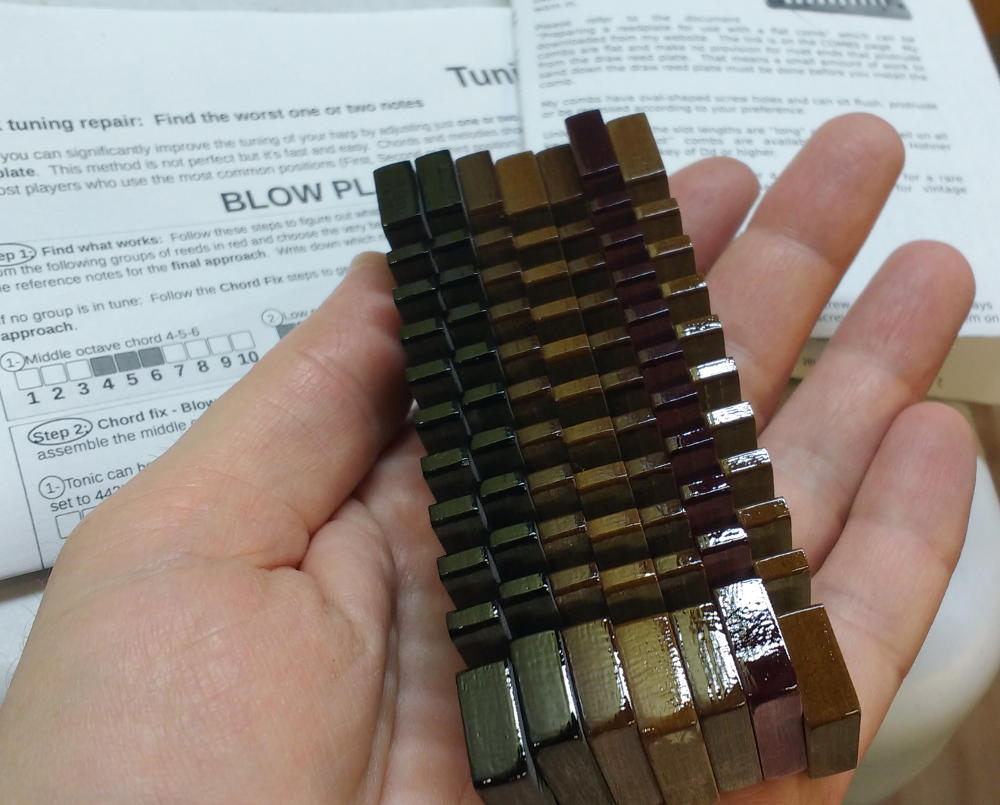
I make mistakes. These combs all have slight cosmetic defects due to my mistakes (you may not even notice). They all are 100 per cent functional - none of the problems will affect how these combs perform. I use combs like these for my personal harps.
I guess I make a few more mistakes than I have harps.
Includes:
4 regular thickness (about 5.9mm) combs for Marine Band (two deep black and two dark brown)
2 thick (6.6mm) combs for Marine Band (caramel brown)
1 MS-series (red)
plus a few extra goodies
New Version - this product now ships with enough screws and nuts to convert five Marine Band harmonicas
Support is included!
With the purchase of this product, you get full access to the information you need to get the job done. Just ask! I will help you through the process via email if you need assistance
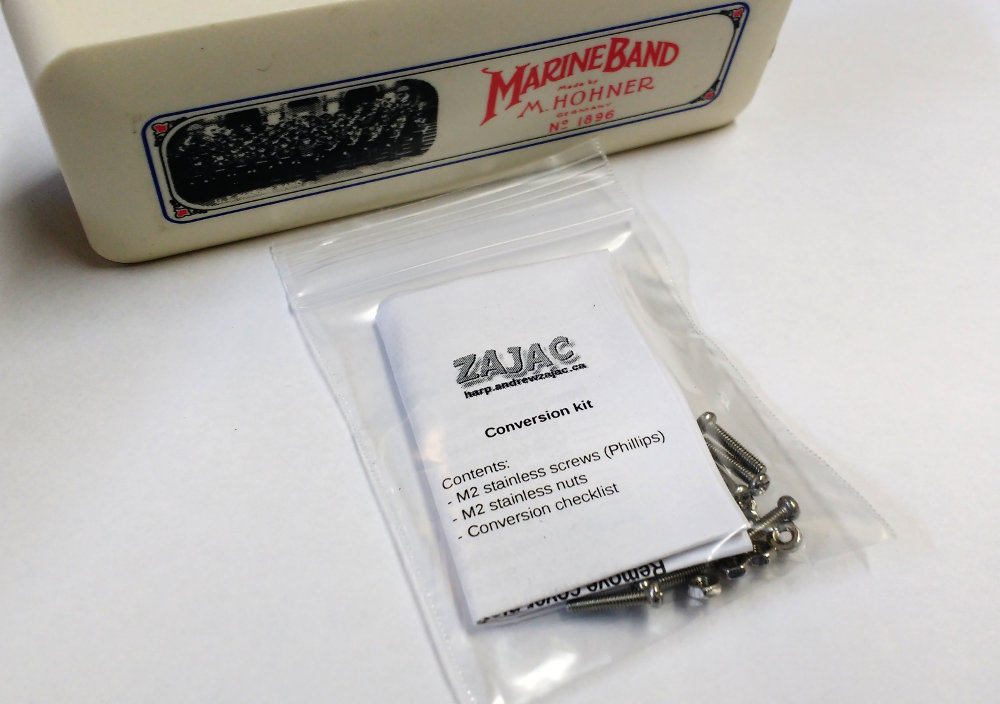
Almost every harmonica player had owned a Marine Band 1896 harmonica. They are the traditional gold standard diatonic harmonica.
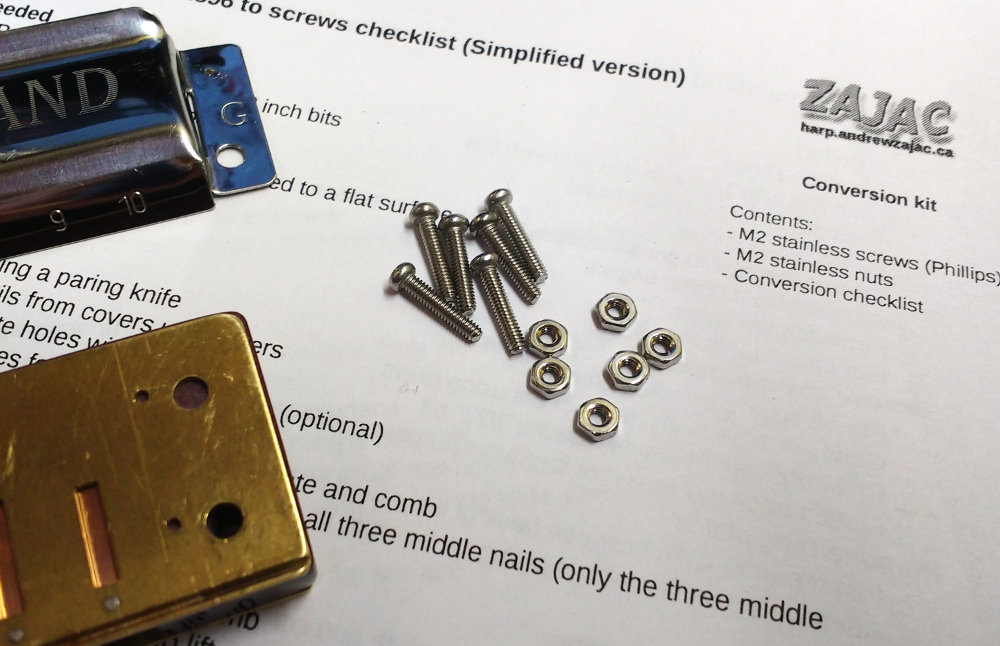
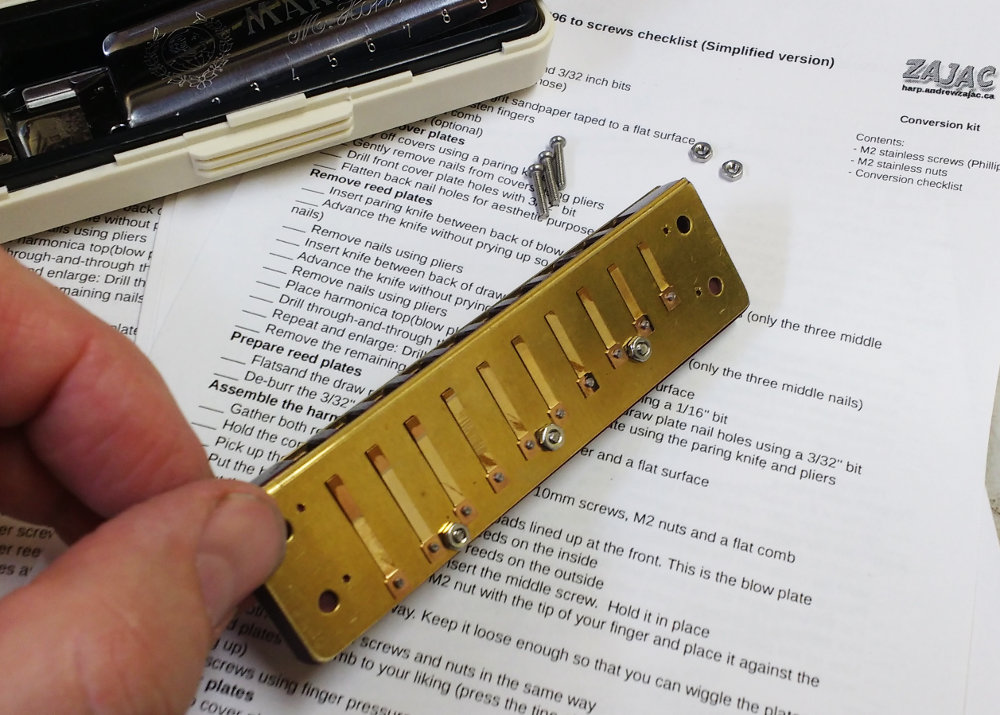
For many, the fact they are assembled with nails can cause a problem if you want to improve the comb, perform reed work or embossing. This kit provides you with the necessary stainless steel screws and nuts as well as instructions to convert a Marine Band 1896 from nails to all-screw assembly.
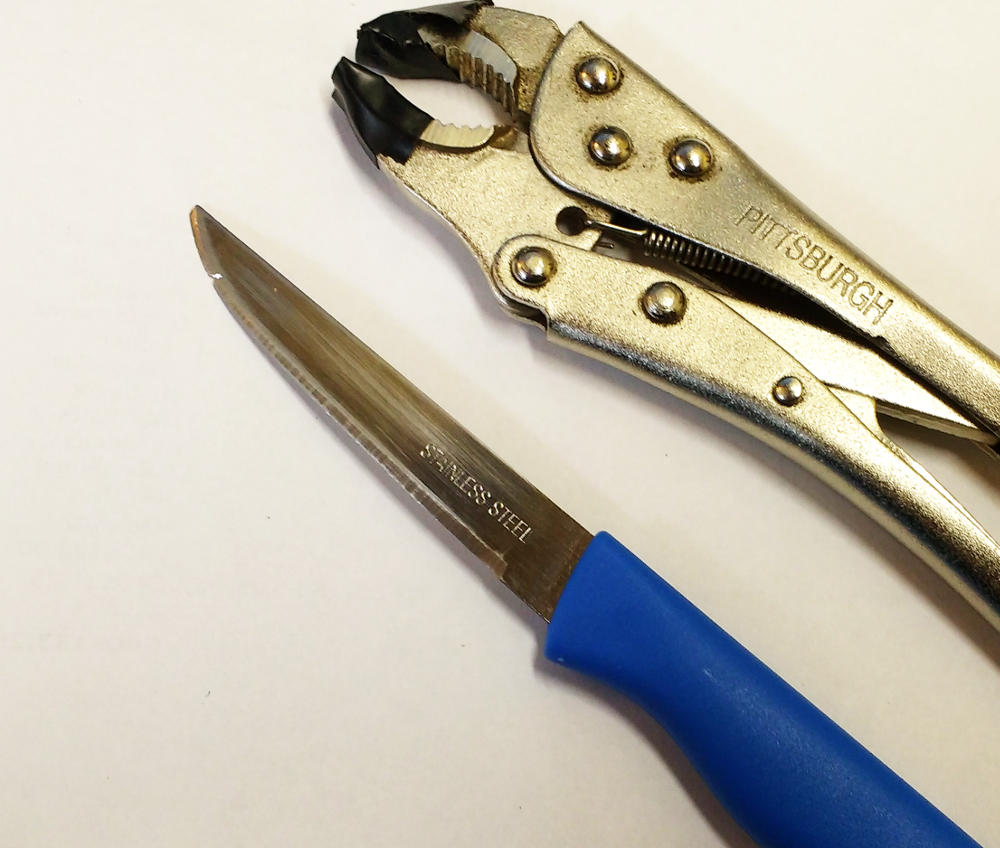
(A pairing knife to open the Marine Band 1896, a drill and other commonly available supplies are not included with this kit but are easily obtainable.)
Nuts are used instead to adding the extra steps of tapping (creating a thread) the draw plate to speed up the process. This simplified approach is the easiest way to convert from nails to screws.
Contains:
25 +2 extra Stainless Steel M2 screws for the reed plates and the cover plates
25 +2 extra Stainless Steel M2 Nuts
One checklist to help you through the process
Three screws hold the reed plates to the comb and two more hold the covers on to the reed plates.
Only five screws and nuts are needed for this job but two extra are included just in case you drop a screw on the floor... These screws have a Phillips head - No need to buy a weird-tipped screwdriver to use these!
About 99 per cent of harp players own at least one Marine Band 1896 harmonica - the old school type held together with nails. The nails don't have to get in the way of working on the harp.
You can take the plates off the comb and put them back on using the original nails. It's maybe a little extra work but the harp will perform just fine.
Here's a description of how to create a "Marine Band Opener" to crack open a Marine Band 1896 to work on it (customize, flatten reed plates, reed curvature, tuning, embossing, etc...)
The 1896 features the exact same reeds as the Deluxe, Crossover, Golden Melody, Special 20 and Hohner Rocket - it packs a lot of potential!
You can either covert the harp to screws or close it right up again using the original nails - Old School style.
This is part of a series of checklists I am making available to you.
Click the "Printer-friendly version" link at the bottom of the page and feel free to print out as many copies as you like!
----------
Basic embossing checklist
(Half slot embossing)
version 2016/12/13
Items needed
___ Tools to disassemble the harmonica (screwdriver)
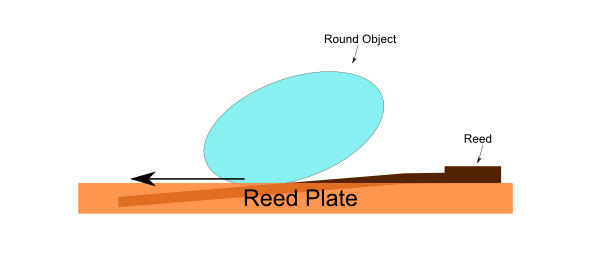
___ A hard round object (Example, a chrome-plated socket) or a specialized Embossing tool
___ Plinking tool
___ Reed work or gapping tool
___ Reed wrench Prep work
___ The harp is airtight
___ The reed shapes are favorable
___ Gaps are set
___ The harmonica plays well (Embossing will never, ever fix a problem) Embossing
___ Take the harmonica apart
___ Lay reed plates reed-side-up on a flat surface
___ Press the Embossing tool or round object into the middle of a slot. Advance to the tip (not the base) using gentle downward force
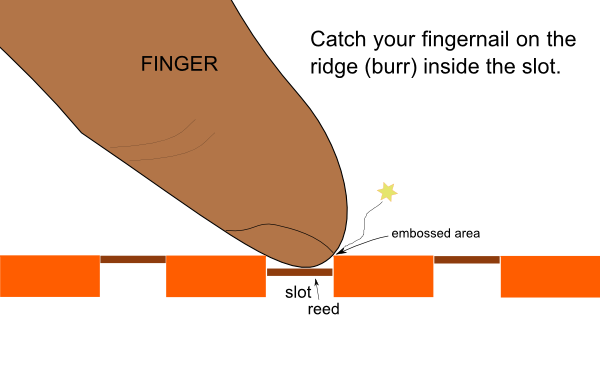
___ Use your fingernail to feel for a catch on the inside of the slot. If none is present, repeat the previous step with slightly more downward force.
___ Plink the reed to make sure you didn't use too much force and over-do it.
___ Repeat the process for the other slots Troubleshooting
___ If the reed won't plink, consider reed alignment.
___ If you embossed too much, apply pressure to "un-do" the embossed ridge using the reed tool or the plinker. Look through the slot and press the tip of the reed through. Can you see where the reed is contacting the slot? Apply gentle pressure to the slot wall in that area.
Here's a way to fix tuning problems that goes straight to the heart of the problem. Don't worry about temperament. Forget about the numbers. Use your ears to figure out what's wrong.
The goal here is to only tune the worst one or two reeds on the reed plate.
The trouble with "hunt-and-peck" tuning is that you can make things worse if you tune reeds at random. If two reeds are out-of-tune with one another, which one do you adjust? Do you focus on chords or on single notes?
Use this opportunity to decide what sounds good to your ears. If you have trouble deciding if something sounds good, an out-of-tune harp will make it easy for you to hear what sounds bad!. This will help you identify what is in tune and replicate it to the rest of the reed plate.
Method:
- Divide the blow plate into three octaves. Play 456 as a chord. How does it sound to your ears? Do the same with 123 and compare. Which one sounds most in tune? If you are in the habit of playing chords on the top octave, try the 789 and 10 hole chord.
- If one octave's chord is much better than the others use it as a reference. If all the chords are bad, break down the 456 chord by intervals (tonic octave - 1-4 blow, thirds - 4-5 blow, and fifths - 4-6 blow). Consider what reed in the 456 you need to change to make it sound nice. Use a piece of paper to write down your plan.
- Play a melody in the middle octave and try to notice if any notes sound off. If you can accompany yourself using a jam track, do so.
If you are in the habit of playing in positions other than First, Second or Third, play a melody in that position and listen to what notes sound out of tune. Compare the same melody in another octave (use the same position.)
- Decide which problem is worse: Do I need to fix chords? or Do I need to fix individual notes?
- Play all the octaves on the blow plate and find the ones that are our of tune.
1-4
2-5
3-6
4-7
5-8
6-9
7-10
You have already determined what reed(s) are the culprit in the earlier steps. Example, if the 1-4 octave sounds bad, but you like all the notes of the 456 chord, then tune the 1 reed to agree with the 4.
- Pick the one or two worst reeds on the plate and fix them. Don't aim for perfection, just make things sound good.
Remember: "Better" is the enemy of "Good". If the tuning is "good", move on and forget about making it "better".
- The process is almost the same for the draw plate. Focus on the 234 draw chord; do not consider any other chords on the draw plate. Play the chord and play a melody. Identify whether the chord or the individual notes are out-of-tune. Adjust individual reeds by using the following octaves:
1-4
3-7
4-8
5-9
6-10
Would you like me to make a video about your "best" mistake? Contact me and let me know your ideas!
I call my new approach sympathetic reed work™ because it's important to unite all the forces that are acting upon the reeds.
_________________________________________
Reed work can be described as the strategic reshaping of a reed. I spent years developing my reed work so that reeds behave just the way I want.
The key is to work in small steps and to follow some simple rules: a theoretical model. With each small change, reevaluate the reed to confirm it behaves as expected and then make the next small change until the goal is reached.
Sometimes I observed interesting variances while following this process. I observed some quirky behaviors from some reeds every now and then. By the laws of the theoretical model I was following, what I was seeing should not work, yet there it was!
No biggie. Nothing to get excited about - my methodology was working just fine and I was getting the results I wanted. These extra results were interesting but they weren't getting in the way of getting the job done.
Just forge ahead and reach the goal! It's only that my theoretical model wasn't explaining every detail of what was going on. Forget about it and keep working in your comfort zone. There's work to be done! I said.
But after a while, I decided to chase down these variances. I wanted an explanation.
I expanded my theoretical model and explored whether the new version explained what I was seeing. I recreated those anomalous results and carefully observed what part of my model was right and what was wrong as I tweaked my approach to reed work. Each time I was wrong, it challenged my model and added to the picture.
There are several forces acting upon the reed other than our breath. I choose to think of breath force in terms of air flow rather than just a pressure gradient. This allows me to find the best shape of the reed so that it catches the wind like a sail. It's also possible to harness the other forces in action at the same time much in the same way.
After a few iterations I settled on a revised theoretical model which encompasses both my old approach and my new approach. I can explain and predict everything I am observing. No more anomalies.
A harmonica isn't very complex - there are only 20 moving parts (the reeds). But the deeper you look for the things that make it play well, the more you find the things that can go wrong. There's a lot going on inside this simple technology.
I call my new approach sympathetic reed work™ because it's important to unite all the forces that are acting upon the reeds.
In my model of all the forces in action, the reed must play a supporting role.
What's exciting is that I can use this new approach to get excellent results with less time and effort than before I went down this path. I'm not done exploring; I think sympathetic reed work has a lot more potential to offer.
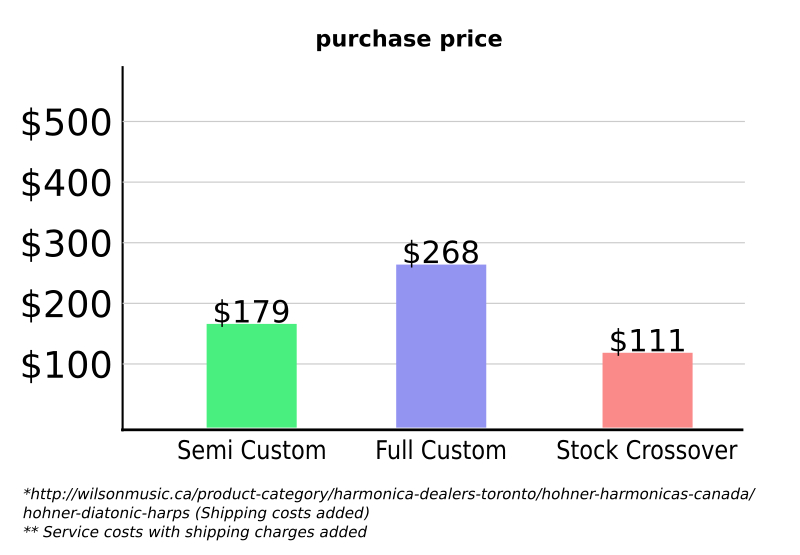
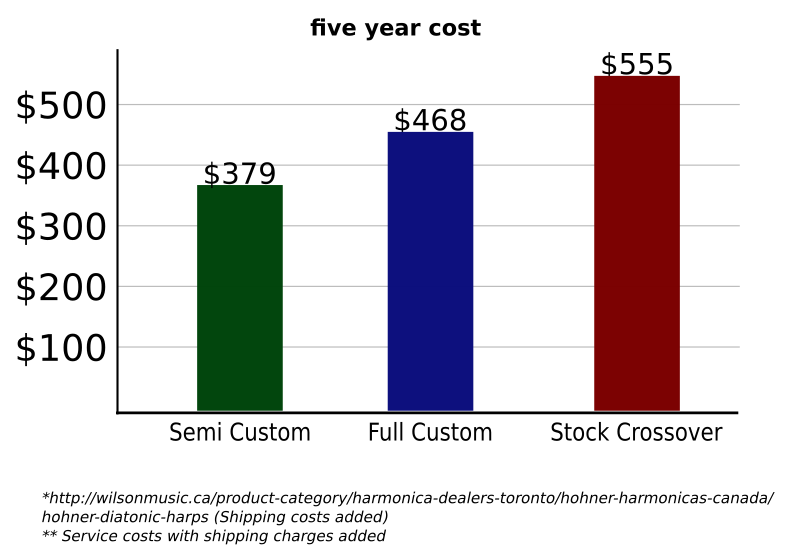
Despite the higher initial cost, over five years the overall cost of ownership of a custom harmonica is significantly lower than the cost of stock, off-the-shelf harmonicas.
My custom harmonicas are remarkably responsive, loud and FUN to play. They are sold at a higher price that stock, off-the-shelf harmonicas, but they are much better instruments. Considering the hours spend on customizing each instrument, a custom harmonica is better value despite the higher price.
When you buy a custom harmonica from me, you can expect to have a well-playing instrument for years to come. This is because I offer service to your custom harmonica.
If you look a little beyond the initial purchase, a custom harmonica is usually cheaper to own that a stock instrument.
My service extends the life of the instrument. Reeds can be replaced, the tuning can be adjusted and the harp can maintain its high level of response and volume far beyond the lifespan of a stock harp.
Let's assume a harp lasts about a year before it becomes worn out. I believe a custom harp can last longer than a stock harp in most cases but to be fair, let's consider both harps equally.
To replace a stock harp, you will need to spend the purchase cost on a new harp. To service my custom harp, you will need to spend about $50 ($30 plus two way shipping)
Comparison: Over Five years:
Hohner Crossover* - $111 x 5 = $555
Semi custom Hohner Rocket - $179 + $200** = $379
Custom Hohner Marine Band Deluxe - $268 + $200** = $468 ** Service costs with shipping charges added
My custom harmonicas are much better instruments than stock. Despite the higher initial cost, over five years the overall cost of ownership of a semi-custom or custom harmonica is significantly lower than the cost of stock, off-the-shelf harmonicas. My custom harmonicas offer much better value than stock instruments.
A Facebook friend asked about Tuning-Embossing-Shaping. "Knowing when I'm getting tired and/or impatient and knowing when it's time to get up & walk away."
Would you like me to make a video about your "best" mistake? Contact me and let me know your ideas!
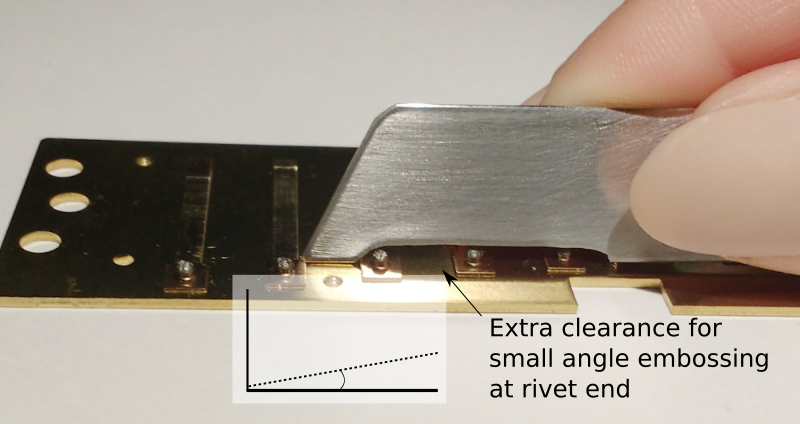
I have improved my embossing tool to provide more flexibility (and safety) at the rivet end. With it, you can emboss with a wide range of angles all along the length of the slot.
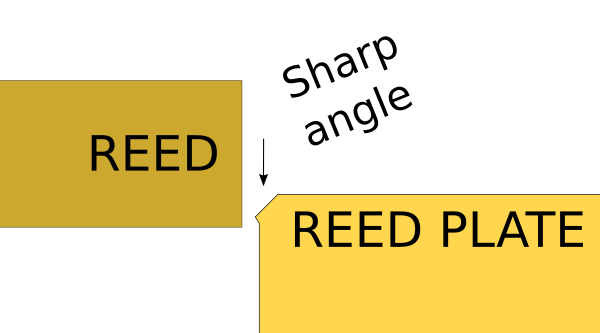
Here is an illustration of what the different angles of embossing look like if you zoom in really close to a cross-section of the slot.
This is embossing at a 45 degree angle:
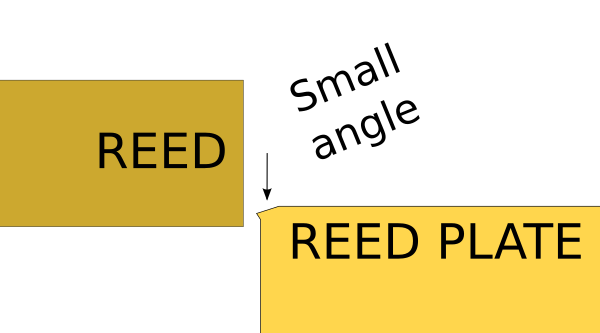
This is embossing with a smaller angle:
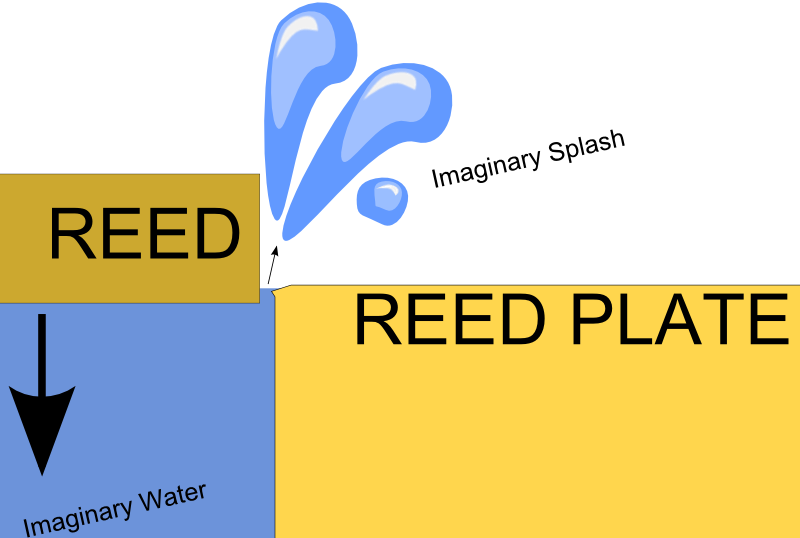
Why is the angle important?
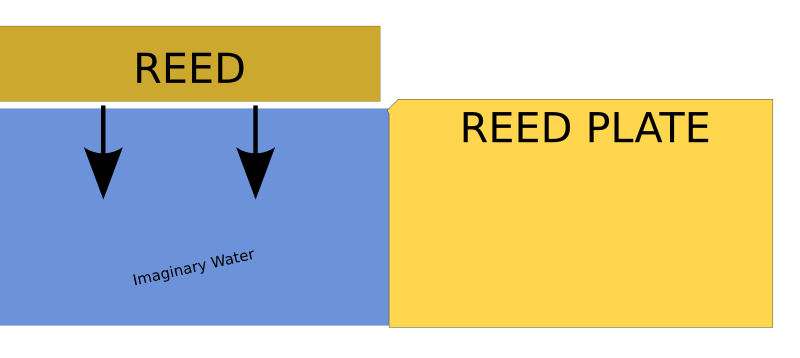
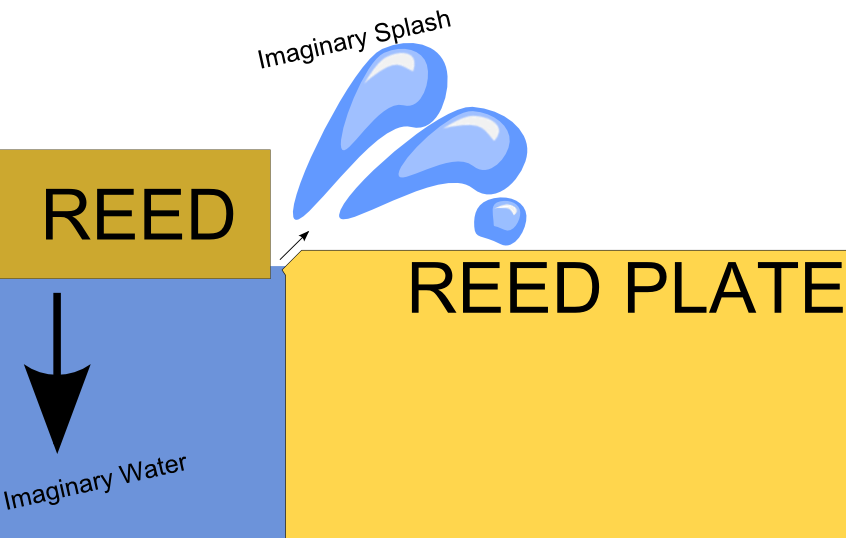
I visualize each slot as a tiny swimming pool. In my model, when the reed hits the water it creates a splash and the angle of the embossed edge can change the direction of the splash.
Here is the reed just before it hits the imaginary water:
A sharp angle would make the water "splash" further away.
Here the angle of the embossed edge is a lot smaller. A smaller angle would make the water "splash" higher
Different angles can offer different results as far as tone and response. You can use different angles on different portions of the slot. I encourage you to discover what is the best pattern for you.